Adding a New Banner
The only way to manage your banner is through django CMS, a content management system platform linked to this site that makes the administrator's job more quick and simple. To get started, observe the following guidelines:
-
Always log in using your Admin credentials.
-
Go to homepage, quickest way to do that is by clicking the JAWDA AND JAWDA logo.

-
Enable the editing mode of the page, there are two ways to do that:
- First and simplest way is by clicking the Live status button at the top right hand of the page. Once clicked, it will turned to Draft status.
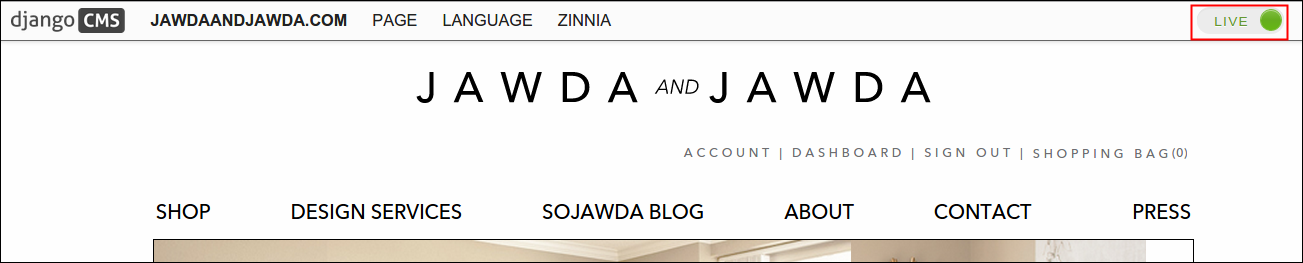
- Second is through Page menu at the top of the logo, click the said menu and select Edit this Page from the drop down list.

-
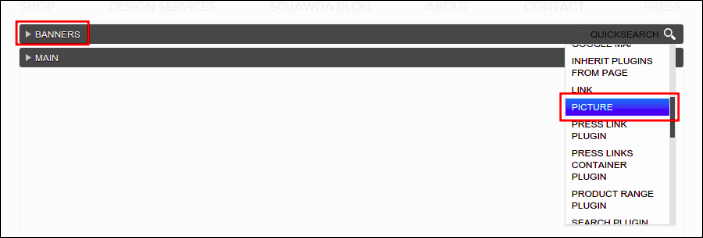
You'll find two distinct buttons named Structure (back end framework of the page) and Content (user facing page), click Structure to show the admin platform.

-
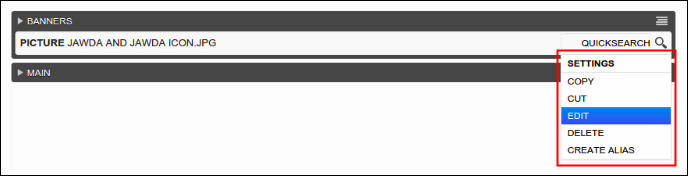
From there, look for Banners plugin, click its menu and look for Picture. A new window will then come out.

-
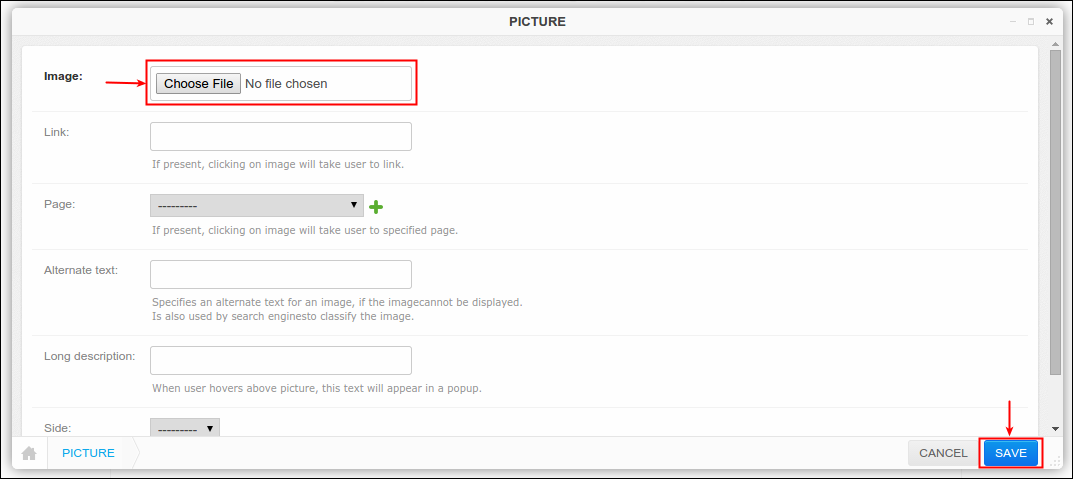
To upload an image click Choose file and locate the picture that you want to display as your banner, click Save afterwards.
-
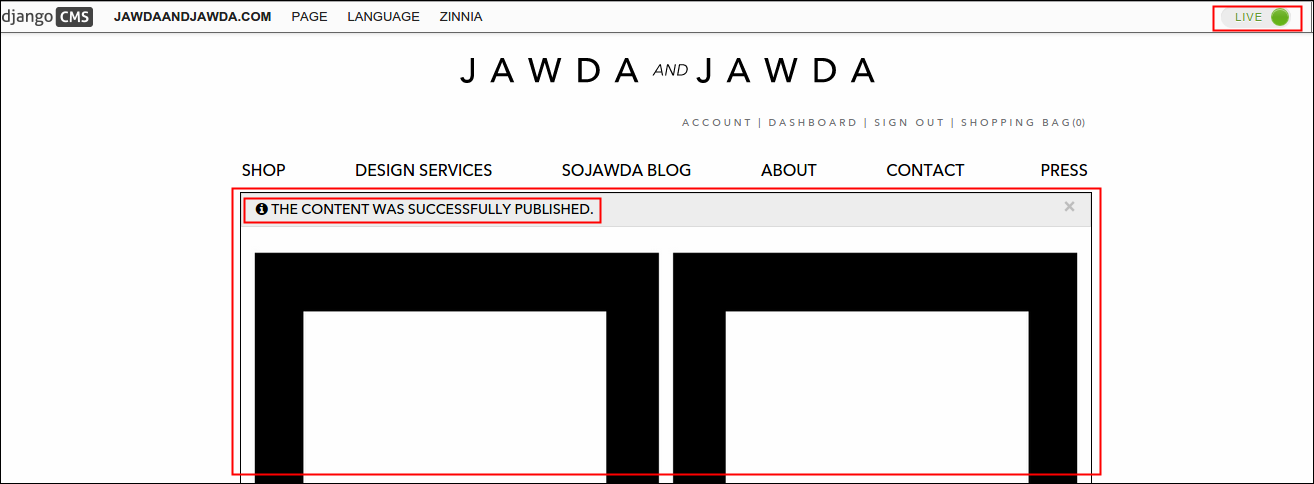
To post the made changes on main site, click Publish Changes. Once clicked, notice that page status is now back to Live, a confirmation message will prompt and voila the image is now posted.

Changing an Existing Banner
-
Log in using Admin credentials.
-
After you signed in, go to homepage, quickest way to do that is by clicking the JAWDA AND JAWDA logo.
-
Choose from two different ways of editing the page, either way will lead you to same page. See step 3 of Adding a new Banner.
-
Click Structure.
-
Click the menu of the uploaded image and select Edit.

-
Picture window will come out, change the existing banner by clicking Choose file , locate and upload your preferred new image and click Save. One other way to change the current banner is by deleting completely the existing one (Banner > Existing Image > Menu > Delete) and replace it with a new one through Banners menu, follow the steps 5 & 6 from Adding a new Banner.
-
Make sure to click the Publish Changes button to post the made changes.
Deleting an Existing Banner
-
Log in using Admin credentials.
-
After you signed in, go to homepage, quickest way to do that is by clicking the JAWDA AND JAWDA logo.
-
Turn your page into editing mode, click Live status button located at the top right hand of the page. Status will turned to Draft after, that means page is now ready to be modified.
-
Click Structure.
-
Click the menu of the uploaded image and select Delete.
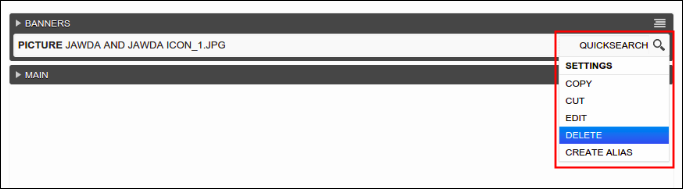
-
A confirmation message will pop out to validate your action.
-
Click Yes, Im Sure button to continue or Cancel to return to plugin menu. When Yes, Im Sure button is clicked, hit the Publish Changes button to post the made changes.
Enabling Image Slider Option on Banners
Site has this option called Image Carousel or Image Slider (sometimes called 'rotating offers'). This option was normally used to display different set of offers in homepage alone. Like a merry go round, this option continously rotates and display the images that you inserted on the plugin. To enable this option, refer to the following procedures:
-
Make sure to log in using your Admin credentials.
-
Go to homepage, to do that simply click the Jawda and Jawda logo.
-
Click the Live status button located at the upper right hand of the page. As you clicked this button, Live status will turn to Draft and two buttons such as Structure and Content will appear beside it.


-
Click Structure to see the back end side of the site. On Banners, click the menu and look for Banner Container Plugin. Select this plugin, its window will pop out with a message that says 'there are no further settings for this plugin'.
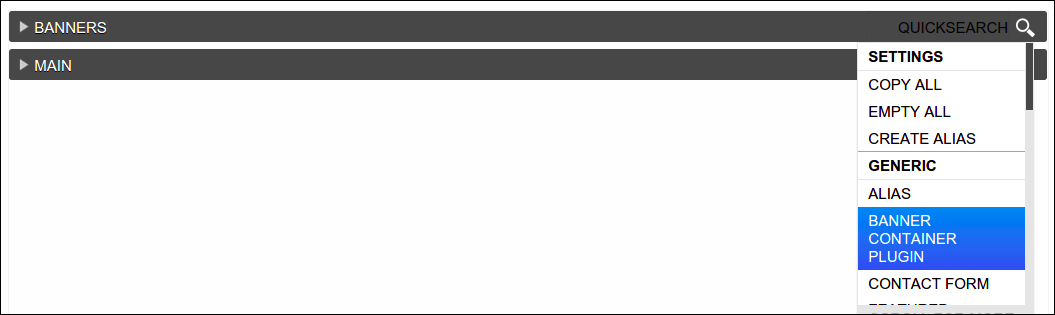
-
To finish, click the Save button. After you saved your action, you'll notice that the plugin is now displayed under Banners and it is now ready to display your images like a slideshow. To learn how to add images on this plugin, refer to the next section.

Add Image on Banner Container Plugin
You learned how to enable the Banner Container Plugin earlier, now is the time to experience adding image on it. These images are the pictures that will display and flashes in your homepage. To start adding image, follow the steps below:
-
Log in using your Admin credentials.
-
Same with what we did in enabling the Banner Container Plugin, go to homepage (simply click the Jawda and Jawda logo) and click the Live status button.
-
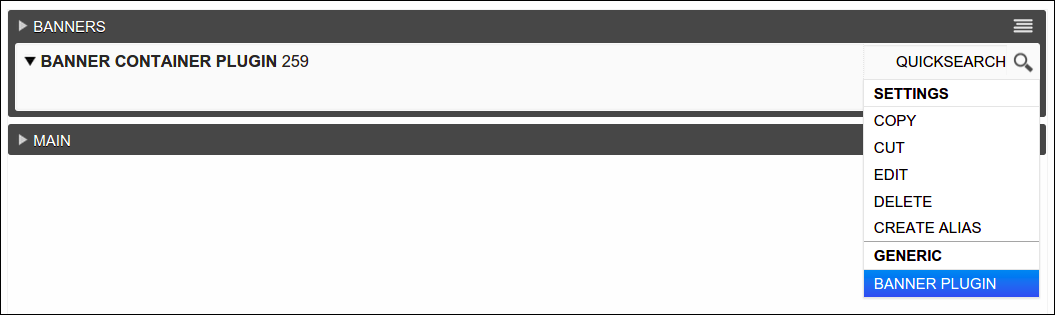
Click the Structure button and from Banner Container Plugin menu, locate the Banner Plugin.
-
Select Banner Plugin and wait til its window displays. Click Choose File and from then select the image that you want to display on your banner and click Save.

Wait until the page finish its loading and voila, image is now saved under Banner Container Plugin. To add more image, follow again the steps 3 & 4.

-
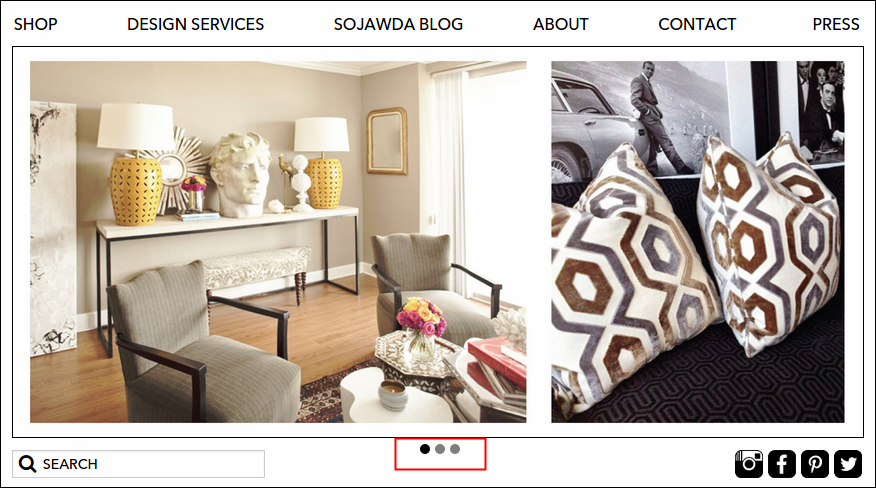
To finish, click Publish Changes button (the blue one) and this will display your changes on the main site. This feature will automatically display each of your uploaded images like a auto slideshow, or you can click the small dots (see picture below, highlighted in red) under the banner image to manually navigate each pictures.
Adding Details on Footer Links
-
Log in using Admin credentials.
-
Click Live to edit the page and click one of the 3 footer links located at the bottom left hand of the page: Returns, Privacy Policy and Orders and Shipping. As an example, select Returns.
-
You should be now directed to Return page, to check that observe the address of the page, it should be now jawda-staging.softwarelab7.com/returns. It is blank page because you haven't enter any values yet.
-
Click Structures and locate Main plugin.

-
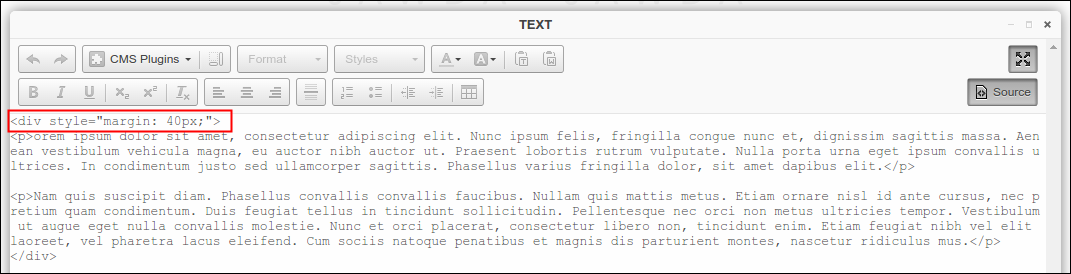
Hover to its menu and select Text template. On this template you can add text or image to display the content of your page.
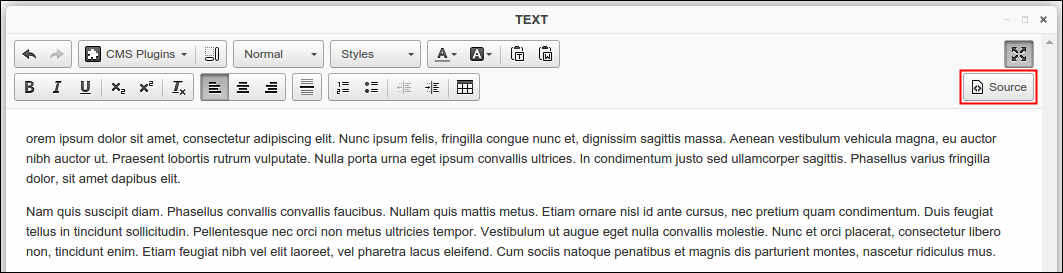
Use Source button to style your page using html, see the example below. I added a margin so that the text would display with border on each sides. You may also check Styling and Writing your own HTML using CMS to learn more about HTML.
-
Click Save and then publish the made changes.
Changing the Link of Existing Social Media Buttons
-
Log in using Admin credentials.
-
Click Live to edit the page and then hit Structures.
-
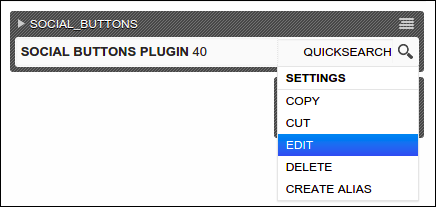
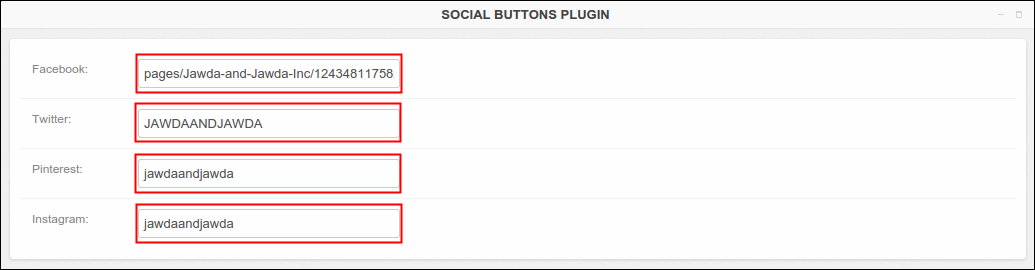
Locate Social Buttons plugin.

-
Hover over Social Buttons Plugin 40 menu and select Edit.
-
Social Button Plugin will pop out with current value or link per social media account. To change the link, simply override the new link to any of the four existing social media fields.
-
Click Save and then publish the made changes.
Modifying the content on Text Plugin
The text plugin that you can find on CMS has different functions that you can use to modify the content that you made. These functions are located at the upper part of the Text Plugin window. Function icons and its usages are listed below:
 Undo & Redo- this will undo or redo your last action.
 CMS Plugins- allows you to ad any of the given plugins (file, link and picture).
 Font Size- this allows you to change the font size for selected text.
 Paragraph Format- allows you to select a header level to apply to the text or simply select Normal as its default.
 Formatting Styles- provides list of style options to apply on your content, Lower case format is available on this section.
 Text Color- allows you to change the text color for the text you've selected.
 Background Color- allows you to apply a color background to selected text.
 Paste as Plain Text- this allows you to paste text as plain text.
 Paste from Word- this allows you to paste content from Microsoft Word.
 Bold- this applies bold styles to selected text.
 Italics- this applies italic styles to selected text.
 Underline- this applies underline style to selected text.
 Subscript- sets the text to be a subscript of other text.
 Superscript- sets the text to be a superscript of other text.
 Align Left- left justify the selected text.
 Center- center justify the selected text.
 Align Right- right justify the selected text.
 Insert Horizontal Line- allows you to create a horizontal line across your entire content.
 Insert/Remove Numbered List- adds or removes numbered list to your page.
 Insert/Remove Bulleted List- adds or removes bulleted list to your page.
 Decrease Indent- decrease the indent of selected content.
 Increase Indent- increase the indent of selected content.
 Table- allows you to enter table to your page.
Styling and Writing your own HTML using CMS
One other way to improve the look of your page is by using HTML. HTML or Hypertext Markup Language has a big role in modifying the elements of a site. It consists series of short codes that are called tags. Tags are the word between the angle brackets that normally come in pairs, the start tag <tag>and the end tag </tag>.
Simplest way to style a page is by adding the style=" " attribute to an html just like <div> tag. <div> represents division or section of a page. Common way to add one style property attached to a <div> tag looks like this:
<div style="property:value;"> </div>
For example, you want the size of your text to be 10px, the attribute would look like this:
<div style="font-size: 10px;">text</div>
You may also apply more than one property in the style attribute. Simply place a semicolon (;) after your first property and value, then add more property and values every after its semicolons. Let's say you want your text to be 10px and italic, we would write the following:
<div style="font-size: 10px; font-style: italic">text</div>
There are plenty of style property that are very useful in CMS (Text only) and they are as follows:
| Property | Description | Possible Values | Example |
|---|---|---|---|
font-style |
declares the font style | normal italic oblique |
<div style="font-style: italic;"></div> |
font-weight |
declares the font weight, sets how thick or thin characters in text should be displayed | normal bold bolder lighter |
<div style="font-weight: bold;"></div> |
font-size |
declares the size of the font |
refers to lengths (example: 6px, 8px, 10px) | <div style="font-size: 12px;"></div> |
color |
defines the text color to be used |
name color: red, blue, purple | <div style="color: yellow;"></div> |
text-align |
specifies the alignment of text in an element |
left right center justify |
<div style="text-align: left;"></div> |
margin |
defines the space around elements | specify a margin in px: 12px, 8px | <div style="margin-top: 5px;"></div> |
Aside from style property, you should be familiar with some helpful HTML tags.
| Tag | Definition | Usage |
|---|---|---|
<p> |
defines a paragraph | automatically add some space or margin before and after each <p> |
<h1> to <h6> |
heading, <h1> creates the largest headline while <h6> creates the smallest |
for headings only |
<b> |
creates bold text | emphasizes a word (bold) |
<i> |
creates italic text | emphasizes a word (italic) |
<ol> |
creates a ordered list, this can be numerical or alphabetical |
works with <li> tag |
<ul> |
creates a bulleted list | use <ul> together with <li> to create unordered list |
<li> |
defines a list item | used in ordered list <ol> and unordered list <ul> |